The method of “manually creating an Outlook mail profile”, have many disadvantages – it is complicated, it’s not a suitable method for the dynamic nature of the Office 365 environment, it could lead to human error in the process of entering the required details and more.
So now the obvious question could be: “why should I learn how to use the option of creating Outlook mail profile manually”?
The answer is that most likely that you will never need to use the “manual option” because, in the troubleshooting scenario, we can use a more efficient method.
So why did I write this article?
The simple answer is that there are many users that still Insist about implementing the “manual method.” The other answer is that by reading this article, we can learn additional and exciting information about the subject of an Outlook mail profile, the process of Autodiscover and the components that “build” the Outlook mail profile.
Before we begin
Part 1 and part 2 of the article include general information about the Outlook mail profile and the requirements for creating a manual mail profile (The blah blab part).
If you like to go right down to the “how to” description, you can jump to part 3:
Part 3 – implement manual configuration of Outlook mail profile in an Office 365 environment
Part 1: Outlook mail profile type and troubleshooting procedure in Office 365 environment
Outlook mail profile
Outlook mail profile can be created in two ways:
- Automatically – by using the Autodiscover service
- Manual – by editing and entering the required setting manually
1. Automatic mail profile (Autodiscover)
The standard way to configure Outlook mail profile is by using the “automatic” option that based on the Autodiscover service. Using the automatic option, make the task of configuring Outlook profile a very simple task because the mail profile created automatically.
All we need to know is the recipient’s E-mail address, login username, and password. Outlook uses the Autodiscover service to retrieve the rest of the required information for the mail profile (the rest of the Outlook mail profile completed automatically).
The Autodiscover process based on a query that sent to the DNS server, looking for a Hostname (the Exchange server name) that could provide the required information.
The “necessary information” for the Outlook mail profile includes:
- The name of the Exchange Online server which hosts the user mailbox
- The required Outlook mail profile setting needed for the Outlook Anywhere configuration (encrypted\secure communication channel between Outlook and Exchange server)
2. Manual mail profile
The method of: “Manual Outlook mail profile” belongs to older days (Exchange 2003), in which the only option for creating an Outlook mail profile was the “manual option.”
In Office 365 environment the only time that we need to use the possibility of creating Outlook mail profile manually is in case that the required DNS setting for the Autodiscover record is missing and, we cannot use other “workaround” for the task of configuring Outlook mail profile automatically.
Creating an Outlook mail profile | Troubleshooting process
It’s true that the article name is – “Manual configuration of Outlook mail profile in an Office 365 environment” but, before we get to the discretion of the required steps, it’s imperative that we will be able to see the “big picture.” The big picture of the troubleshooting process that relates to the task of – creating a new Outlook mail profile in an Office 365 environment and the optional solution that will enable users to get access to their mailbox in the cloud.
In a scenario in which we cannot create a new Outlook mail profile, there could be several causes that consider as a “responsible” for this problem. The primary cause most of the time is the: Luck or a misconfiguration of DNS Settings (CNAME record) that should configure in the Public DNS.
In case that we find that the required CNAME record is missing, the best option is to add this record to the public DNS server but, in some scenarios, we don’t have the possibility to access the public DNS.
For example, we don’t know which DNS server is hosting the public domain and, we don’t have the required username and password for login to the DNS management, etc.
The three optional temporary solutions (workarounds) that will enable us to accomplish the important task of- allow users to access their mailbox (using Outlook) in Office 365 are:
1. Update the local HOSTS file.
Instead of using the CNAME record in the Public DNS, we can add the IP address and FQDN of the Auto discover service to the local HOSTS file.
2. Configure Outlook profile using the “onmicrosoft” Office 365 recipient E-mail address.
In this solution, instead of using the “public E-mail address” of the Office 365 user for configuring the Outlook mail profile, we will use the “onmicrosoft” Office 365 recipient E-mail address. In this solution, we bypass the need for “publishing” the Autodiscover CNAME record in the public DNS.
3. Creating a manual Outlook profile
The “manual” method is the less preferred solution and, the recommendation is to use this option only when we cannot implement any of the “former solutions” or, we have a special “affection” to the method of Manual configuration of Outlook mail profile.
Image may be NSFW.
Clik here to view.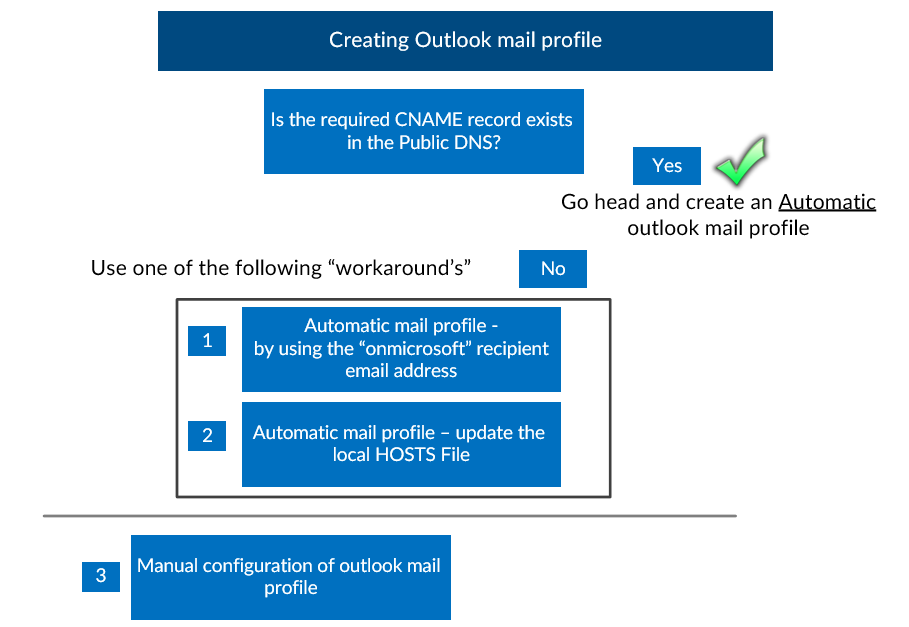
Part 2: description of the process and the required information for Manual configuration of Outlook mail profile
How to get the required information (parameters) for manual Outlook mail profile in an Office 365 environment?
Looking at the diagram, we can see the “groups” of the required information that we need for completing the task of: manual Outlook mail profile in an Office 365 environment.
Image may be NSFW.
Clik here to view.
Part 1 – user’s email address and the user credentials.
This information is required for the creation of an Outlook mail profile, regardless of the Outlook profile that we create (manual or automatic).
A user’s email address – when using the option of manual mail profile, we will use the “onmicrosoft” E-mail address of the Office 365 recipient, instead of the “standard” (public) email address that we use in automatic mail profile configuration.
Part 2 – Mail server information
Exchange Online mail server name – to get the required information about the Exchange Online mail server name who “hosts” the Office 365 recipient, we will use the Microsoft web troubleshooting tool: Remote connectivity analyzer, that will be reviewed in the next section.
Part 3 – Outlook Anywhere configuration settings
Regarding the required information needed for the Outlook Anywhere configuration settings, we will provide this information later on.
Most of the parameters do not consider as “unique parameter” for a particular Office 365 recipient but instead, this parameter should configure in each Outlook mail profile of Office 365 recipient.
onmicrosoft user email address
The main “issue” when creating a manual Outlook mail profile, is to get the Exchange Online server name that hosts the Office 365 recipient mailbox.
Usually, when creating a new Outlook mail profile, The Autodiscover process finds information about the required Exchange Online server by using the Office 365 “Public” email address. The Autodiscover uses the “right part” of the recipient’s email address (the domain part) to search for the Exchange Online server which has the required information.
In our scenario, we will need to find another solution instead of the “standard way” because when creating a manual Outlook profile, we will need to get the Exchange Online server name before we start to create the profile.
For this purpose, we will use a little trick – we will find the name of the Exchange Online server name by using the recipient’s onmicrosoft email address with a combination of the Microsoft troubleshooting web tool: Remote connectivity analyzer.
In Office 365, each recipient gets an “onmicrosoft” email address when the user mailbox created. The DNS setting for the “onmicrosoft” email address automatically set in the Microsoft DNS infrastructure, without the need for additional configuration on the tenant public DNS server.
For this reason, we will use the onmicrosoft email address to “reveal” the name of the Exchange Online mail server (by using the remote connectivity analyzer that reviewed in the next sections).
In the following diagram, you can see the concept that is implemented in the Office 365 environment: each Office 365 recipients get an “onmicrosoft” E-mail address:
(John@o365info.onmicrosoft.com.
When the user mailbox created and most of the time the Office 365 recipient will use an additional E-mail address (Primary email address) that based on the organization public domain (in our example:John@o365info.com).
Image may be NSFW.
Clik here to view.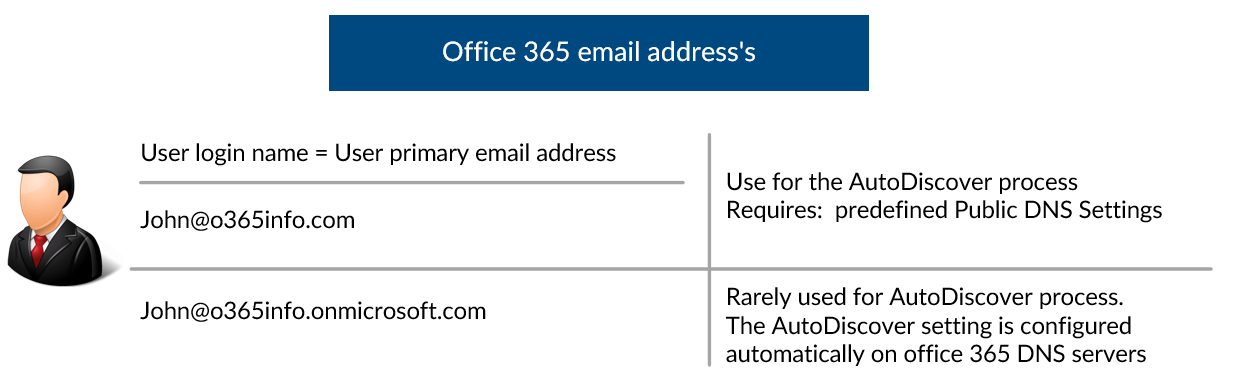
Part 3 – Implement manual configuration of Outlook mail profile in an Office 365 environment
Step 1 – Get the Office 365 recipient onmicrosoft email address
For the demonstration purpose, we will use the credentials of Office 365 recipient named “John” with the following details:
- Public email Address: John@o365info.com
- Onmicrosoft Email address: John@o365info.onmicrosoft.com
To get the onmicrosoft email address of the recipient, use the following options:
- Login to Office 365 portal
- Choose the menu: users and group
- Choose the specific user that we need to configure the Outlook profile for him
- Choose the more menu and the option: Edit Exchange properties
Image may be NSFW.
Clik here to view.
Choose the menu: email address
Image may be NSFW.
Clik here to view.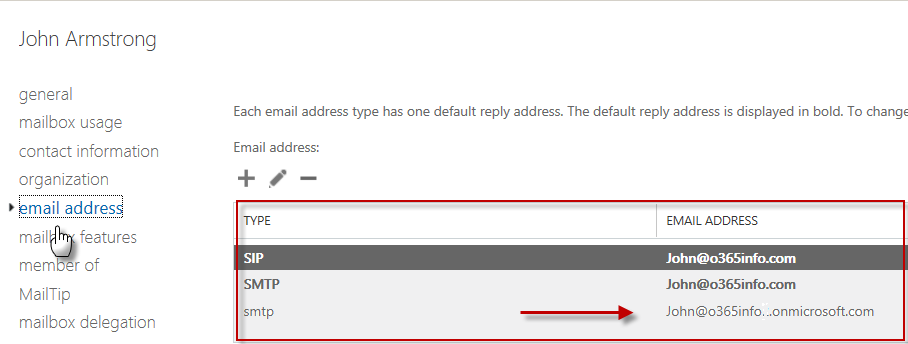
On the right side of the screen, we can see all the recipient’s E-mail address. In our example, we will copy the “onmicrosoft” E-mail address:
John@o365info.onmicorsoft.com
Step 2: Using the Microsoft Remote Connectivity Analyzer.
In the following section, we will review the steps that we need to implement for getting the required information about the Exchange Online mail server.
2. 1 – Access the Microsoft Remote Connectivity Analyzer.
Open your browser and access to the Microsoft Remote Connectivity Analyzer by using the following URL: https://www.testexchangeconnectivity.com
Choose the Office 365 Tab and in the section: Microsoft Outlook connectivity test. Select the option – Outlook Autodiscover. On the bottom right corner, select the Next option.
Image may be NSFW.
Clik here to view.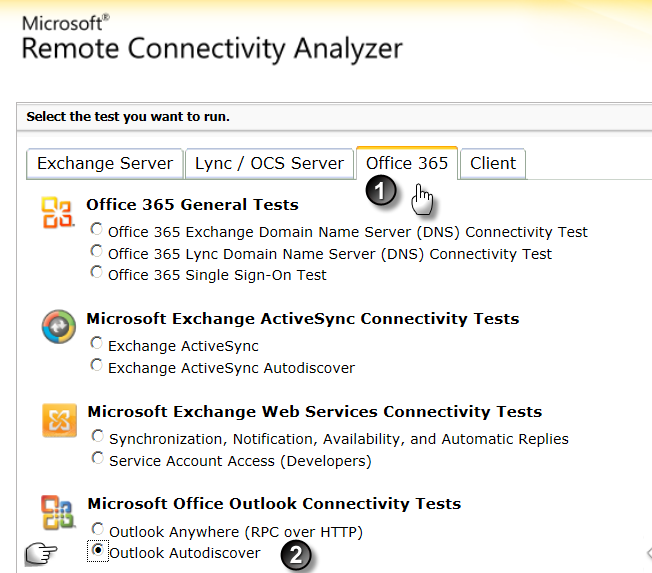
Step 2.2 – Enter Office 365 details
In the following window, we need to provide the recipient E-mail address and credentials.
Image may be NSFW.
Clik here to view.
- Verification (Number 5) – enter the text character and choose the verify option
- Next button (Number 6) – the location of the next button is a little bit hard to find, on the right bottom corner you will find the Perform test option button
Image may be NSFW.
Clik here to view.
Step 2.3 – Find out the Exchange server name in the test results
The last page is the test result. The page includes a very detailed description of each of the steps that involved in the “journey” of Outlook client when finding his Exchange server. To be able to display the result choose the option: Expand all
Image may be NSFW.
Clik here to view.
Our task is to look for two values that appear in the test results: Server (appears in the search result) and, Public Folder server (appears in the search result as <PublicFolderserver>).
In the following screenshot, we can see the values that we look for. In our example, the server name is:7d30b5ec-4218-4f7b-a266-55f45f45960a@o365info.com and the Public Folder server name is dbxpr05.Outlook.com
Image may be NSFW.
Clik here to view.
Write down these values because we will need to use them in the next section when we create the new Outlook manual profile.
Step 3: Manual configuration of Outlook mail profile in Office 365 environment
In the following section, we describe all the steps required for Manual configuration of Outlook mail profile in an Office 365 environment
Step 3.1 – Create a new mail profile
In this step, we will review the “step by step process” of Manual configuration of Outlook mail profile.
Go to the control panel and choose the “Mail” icon. Choose the add option and provide a name for the mail profile (you can choose whatever name you like) and choose the OK button.
Image may be NSFW.
Clik here to view.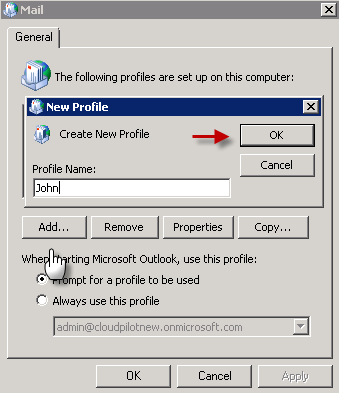
Step 3.2 – Auto connect setup
Choose the option: Manually configure server settings or additional server’s types Choose the Next button
Image may be NSFW.
Clik here to view.
Step 3.3 – Choose a service
Image may be NSFW.
Clik here to view.
Step 3.4 – Server settings
Server (Number 1): in the server “section” we will write down the server name that we got in the former step. In our example the server name is:
7d30b5ec-4218-4f7b-a266-55f45f45960a@o365info.com
User name (Number 2): in the “user name” text box we will need to provide the Office 365 user UPN (User Login Name) and not the Office 365 recipient email address. (the email address cannot serve for authentication purposes).
Don’t choose the “check name” option, because the process will fail. Instead, choose the Next option (only after entering the required information on the next screens, the username verification process will complete successfully).
Image may be NSFW.
Clik here to view.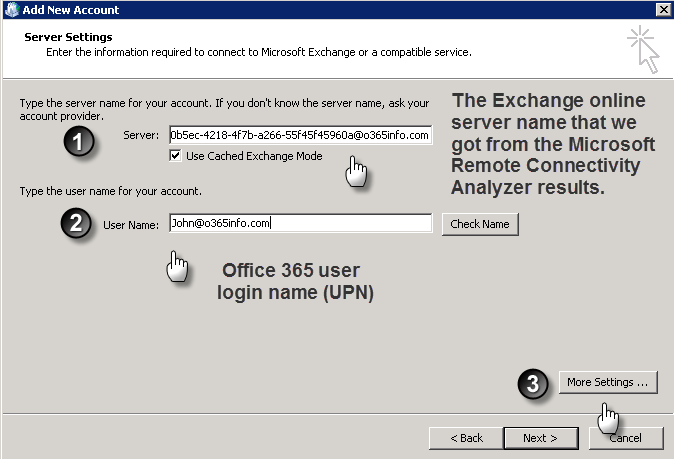
Step 3.5 – More settings – Security tab
Choose the Security tab
In the section: Logon network security choose the option: Anonymous authentication
Image may be NSFW.
Clik here to view.
Step 3.6 – More settings – connection tab
Image may be NSFW.
Clik here to view.
Step 3.7 – Exchange proxy settings
Image may be NSFW.
Clik here to view.
Step 3.8 – Server setting
After entering all of the required information, the last step is choosing the Next option
Image may be NSFW.
Clik here to view.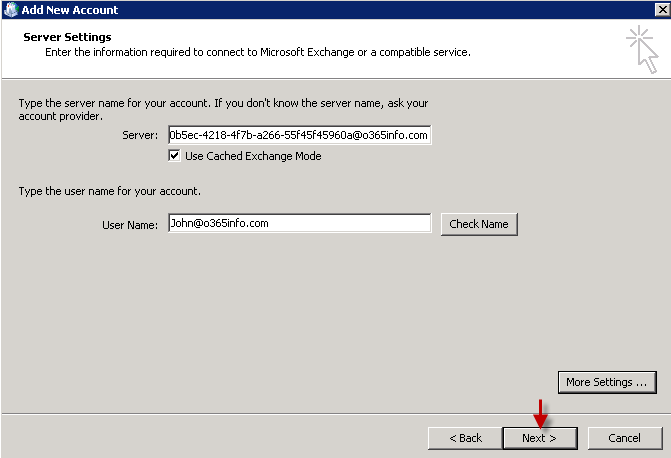
Step 3.9 – Authentication pop out window
The final step is the part of the Office 365 user credentials.
Be aware that in our “unique scenario” the Office 365 login name is different from the Office 365 user E-mail address (onmicrosoft) that we use to configure the Outlook mail profile.
In our example, the Office 365 user login name (UPN) is: John@o365info.com
Don’t forget to check the option of: Remember my credentials
